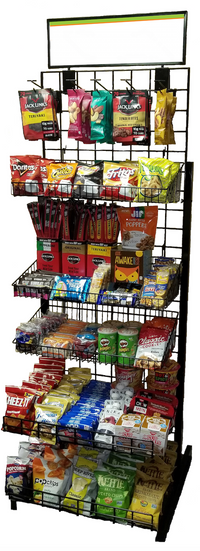
Shelving fixture "rack" assembly. (8)
I recommend you assemble one of your shelving racks at your earliest opportunity. It’s important to understand how simple it is and how portable they are. Also, having assembled one it’s easy to confirm that you have all the pieces and parts. After that, you’ll probably just assemble them at the location on the day of setup.
See the attached pic of the assembled rack. The only difference is that we deleted the 5-chip hangers up top and substituted them with an extra basket because it holds more product and is faster/easier to stock. Soon we will have updated pictures, but this gives you an idea of what the assembled rack will look like.
The manufacturer does not provide assembly instructions because they consider it to be so simple that it would be unnecessary. I’m not so sure I agree with them on that. However, it’s true that when I first attempted to assemble one it really was quite easy.

ASSEMBLY INSTRUCTIONS
The back grid panel is attached to the bases with 6 bolts, 3 on each side. You’ll note that there are bolts, washers, and wing nuts in the parts bag. When attaching each base to the grid panel be sure that the wingnut goes towards the INSIDE and use a washer under it. *Putting the wingnuts “out” creates a risk of injury to users. All the shelves and racks simply hang on the grid panel. You’ll find it is very sturdy. There are very high-quality… commercial grade fixtures.
After receiving and reviewing, please let me know if you have any questions.
Text: (970) 222-8582
Call: (970) 222-8582
Email: Support@Livefree.com
